Starbucks Copycat S'mores Bars Recipe: Your Favorite Dessert At Home
Imagine sinking your teeth into a rich, gooey s'more, but without the campfire smoke, the sticky fingers, or the unpredictable weather. Now, imagine that indulgent experience available all year round, right from your own kitchen. This isn't just a dream – it's the reality of creating the perfect
smores bars recipe. Inspired by the irresistibly delicious S'mores Bars found at Starbucks, this copycat recipe brings that beloved treat directly to you, whenever the craving strikes. Get ready to transform simple ingredients into an extraordinary dessert that tastes like summer, even in the middle of winter.
Why S'mores Bars are the Ultimate Year-Round Indulgence
S'mores hold a special place in our hearts, conjuring images of starlit nights, crackling fires, and cherished memories. But let's be honest, campfires aren't always an option. This is where the magic of an indoor s'mores treat truly shines. A well-executed
smores bars recipe captures every delightful element of its campfire counterpart – the crumbly graham cracker, the rich, melting chocolate, and the perfectly toasted marshmallow – all baked into convenient, shareable bars.
The beauty of s'mores bars lies in their accessibility and versatility. No need to scout for firewood or brave the elements; all you require is an oven and a handful of pantry staples. It's the ideal solution for satisfying that specific sweet tooth any day of the week, whether you're hosting a party, bringing a dish to a potluck, or simply treating yourself to a nostalgic delight. If you're looking for an even simpler approach to this classic dessert, our
Easy S'mores Bars: Enjoy Gooey Perfection Without a Campfire offers fantastic tips for effortless creation.
The Starbucks Inspiration: Crafting a Copycat Masterpiece
There's something uniquely captivating about the Starbucks S'mores Bars that makes them an instant favorite. Perhaps it's the impeccable balance of textures and flavors, or simply the convenience of grabbing one with your morning coffee. Whatever the reason, they've set a high bar for what a s'mores bar can be. Our aim with this
smores bars recipe is to recreate that beloved experience, giving you the power to bake a batch that rivals (and perhaps even surpasses!) the original.
The secret to a great copycat recipe is understanding the core components. Starbucks' version boasts a sturdy yet tender graham cracker crust, a generous layer of creamy chocolate, and a fluffy, golden-brown marshmallow topping. By meticulously replicating these elements and adding a few expert touches, we can achieve that same "OMG delicious" factor right in your own kitchen. It's truly incredible how the simple trinity of graham cracker, chocolate, and marshmallow can become so much more than the sum of its parts.
Crafting Your S'mores Bars: A Step-by-Step Guide to Gooey Perfection
Making homemade s'mores bars is a surprisingly straightforward process, yet the results are incredibly impressive. Let's break down each layer to ensure your
smores bars recipe turns out perfectly every time.
The Foundation: A Buttery Graham Cracker Crust
Every great s'mores bar begins with an exceptional crust. This layer provides the essential buttery, slightly spiced crunch that defines the classic s'more.
*
Ingredients: You'll need graham cracker crumbs, melted unsalted butter, and a touch of powdered sugar.
*
Crumb Choice: While you can crush your own graham crackers using a rolling pin or food processor, many bakers prefer store-bought crumbs for their consistent fine texture. Finely crushed crumbs are key for a cohesive crust.
*
The Mix: Combine the graham cracker crumbs and powdered sugar thoroughly. Then, gradually add the melted butter, mixing until the crumbs are moist but not wet. A common pitfall is adding too much butter, which can lead to pooling. The mixture should resemble wet sand and hold together when pressed, but not be greasy. If it seems too wet, simply add a spoonful or two more of graham cracker crumbs and a pinch of powdered sugar until the consistency is just right.
*
Press and Bake: Firmly press the mixture evenly into the bottom of a 9x13 inch baking pan. Lining your pan with parchment paper or foil, with an overhang on the sides, can make lifting the cooled bars out much easier. Bake the crust for about 8-10 minutes at 350°F (175°C) until lightly golden and fragrant. The crust will firm up further as it cools.
The Heart: A Melted Chocolate Layer
This is where the "gooey" factor truly comes into play. A generous layer of high-quality chocolate transforms these bars from good to absolutely divine.
*
Chocolate Choice: While chocolate chips are convenient, using actual chocolate bars (milk, semi-sweet, or even dark, depending on your preference) chopped into smaller pieces often results in a smoother, more luxurious melt. Consider the classic flavor profile of s'mores and opt for a chocolate that you love.
*
Application: Immediately after removing the baked crust from the oven, sprinkle an even layer of your chosen chocolate over the hot surface. The residual heat from the crust will begin to soften the chocolate.
*
Second Bake: Return the pan to the oven for just 2-3 minutes. This brief second bake allows the chocolate to fully melt and become spreadable, creating a rich, even layer that adheres beautifully to the crust.
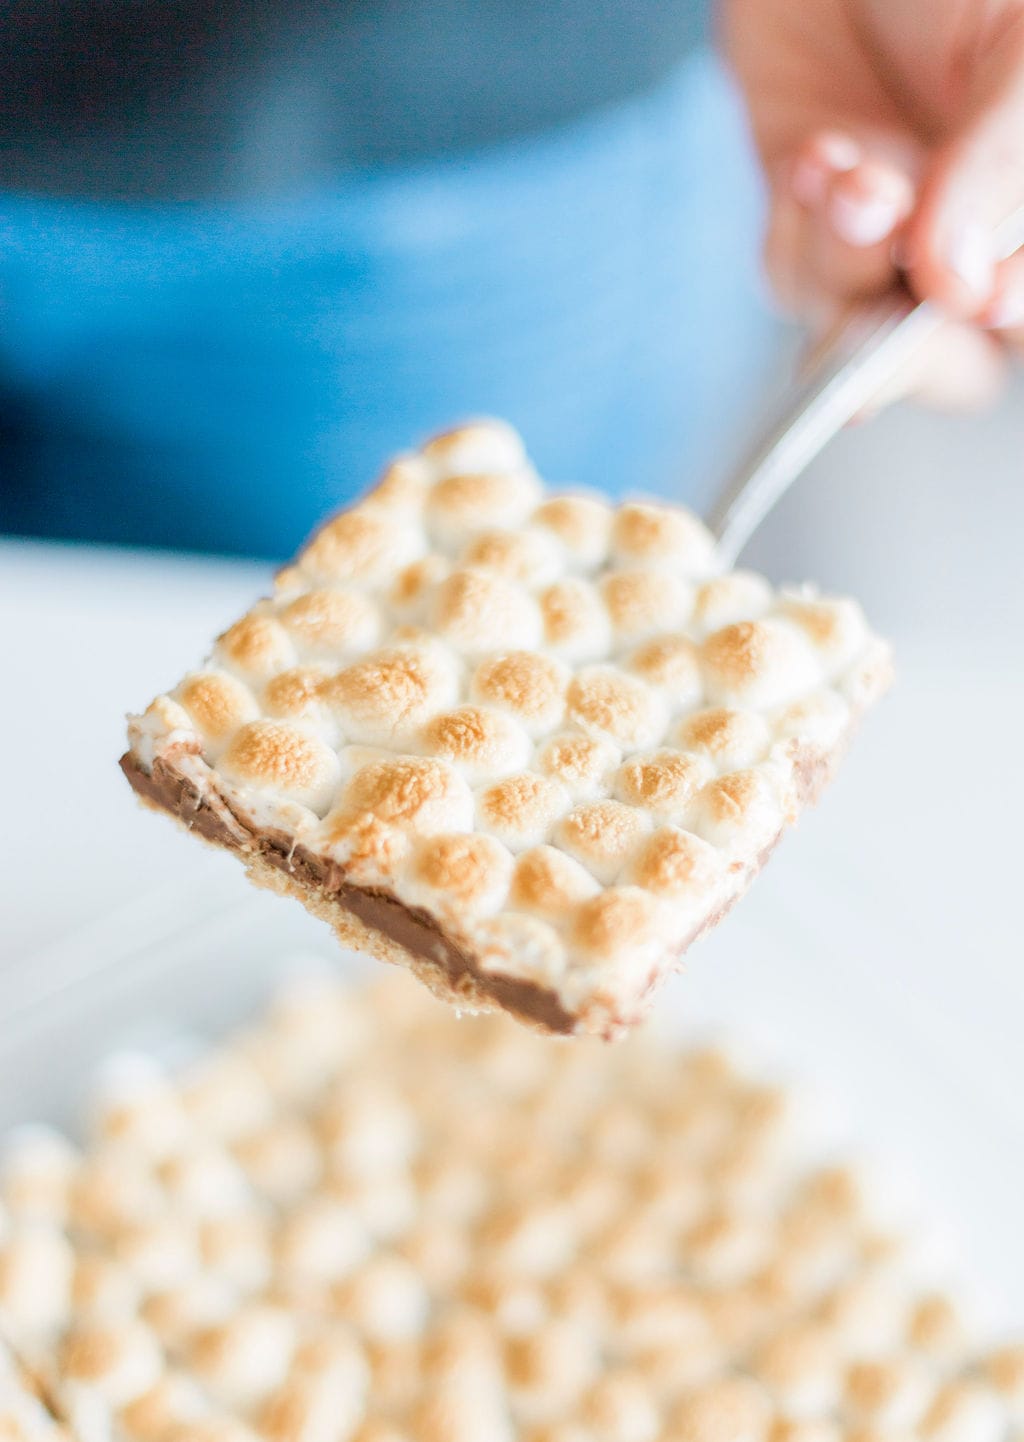
The Crown: Toasted Mini Marshmallows
No s'mores experience is complete without the iconic toasted marshmallow topping – golden brown on the outside, incredibly gooey on the inside.
*
Marshmallow Power: Mini marshmallows are perfect for this
smores bars recipe as they melt and toast evenly, covering the entire surface without creating huge, unwieldy pockets.
*
Placement: Once the chocolate layer is softened and spread, gently press an even layer of mini marshmallows onto the chocolate. Be careful not to disturb the chocolate too much.
*
Broiler Magic: This is where the magic happens! Place the baking pan under a preheated broiler. Keep a very close eye on it – marshmallows can go from perfectly golden to burnt in a matter of seconds. Broil for 1-3 minutes, rotating the pan as needed, until the marshmallows are puffed up and beautifully golden brown. The goal is toasted, not charred, perfection. For additional guidance on creating these irresistible treats, our
Simple S'mores Bars: The Perfect Blend of Graham, Chocolate, Marshmallow article shares more invaluable insights.
Putting It All Together: Cooling and Serving
Once the marshmallows are perfectly toasted, remove the pan from the oven. The hardest part begins now: waiting! Allow the bars to cool completely at room temperature before slicing. This allows the chocolate to set and the bars to firm up, making for clean cuts and preventing a messy, though still delicious, experience. Patience is key for picture-perfect bars!
Expert Tips for S'mores Bar Success
To elevate your homemade s'mores bars from good to absolutely phenomenal, consider these additional tips and tricks:
*
Butter Consistency for Crust: Remember our note about the butter pooling? Start with about two-thirds of the recommended melted butter for the crust, then slowly add more, mixing thoroughly, until your crumbs are moist and clump together but aren't visibly wet or greasy. This flexibility accounts for different graham cracker brands absorbing butter differently.
*
Chocolate Variations: Feel free to experiment with your chocolate! A blend of milk and semi-sweet chocolate chips can add depth. For a richer flavor, try dark chocolate chips or even chopped Hershey's bars for that authentic s'mores taste. Peanut butter chips could also be a fun addition under the marshmallows!
*
Marshmallow Browning: If you're nervous about the broiler, you can also bake the marshmallows at 350°F (175°C) for 5-7 minutes, though they may not get quite as deeply golden. For broiler use, position your oven rack on the second-highest setting, not the very top, to give yourself a little more control and prevent scorching.
*
Storage: Store leftover s'mores bars in an airtight container at room temperature for up to 3-4 days. While they're best enjoyed fresh, a quick zap in the microwave can revive their gooey texture if they've firmed up.
Conclusion
There you have it – your comprehensive guide to creating a truly spectacular
smores bars recipe that brings the magic of Starbucks' favorite dessert (and campfire memories!) into your home. This easy, gooey, and utterly satisfying treat is perfect for any occasion, proving that you don't need a summer night or an open flame to enjoy the classic combination of graham crackers, chocolate, and toasted marshmallows. So, preheat your oven, gather your ingredients, and prepare to delight your taste buds with these homemade masterpieces. Happy baking!